If you’ve been following my smart home journey, you know my goal is always local first. No cloud dependencies, no monthly fees, no “sorry our servers are down” moments when you’re trying to water your lawn. As I looked to make my irrigation system smarter, I made the move from Hunter to OpenSprinkler; and I haven’t looked back.
Why I Wanted to Upgrade
My Hunter PRO-C has been mounted outside my house since August 2018. It works fine. But “works fine” and “integrates with Home Assistant” are very different things. I want to be able to automate watering based on weather, track zone usage, and control everything from my dashboard; not walk outside to turn a dial.
The Hunter is a perfectly capable controller, but it’s a dumb one. Time to fix that.
Other Options I Considered
Before landing on OpenSprinkler I looked at a few of the popular alternatives:
Rachio 3 – The most popular smart irrigation controller out there. Great app, solid Home Assistant integration, no subscription fees. But it’s entirely cloud dependent. If their servers go down, so does your irrigation. That’s a dealbreaker for me.
Hunter Hydrawise – This one was genuinely tempting. The Hunter PRO-C has a modular design where the face panel separates from the wiring base, meaning you can snap in a Hydrawise face with zero rewiring. Clever. But it’s also cloud based, and community support is limited; and for home automation that matters a lot.
Rain Bird – Actually the most cost effective of the three and extremely popular, especially in professional installs. But same story; cloud dependent and requires yet another app and account to manage.
The pattern here is pretty clear. There are plenty of smart irrigation options out there, but I really wanted to avoid signing up for another cloud service and installing another app just to control my sprinklers. All three share that same fundamental flaw for someone building a local-first smart home.
Enter OpenSprinkler
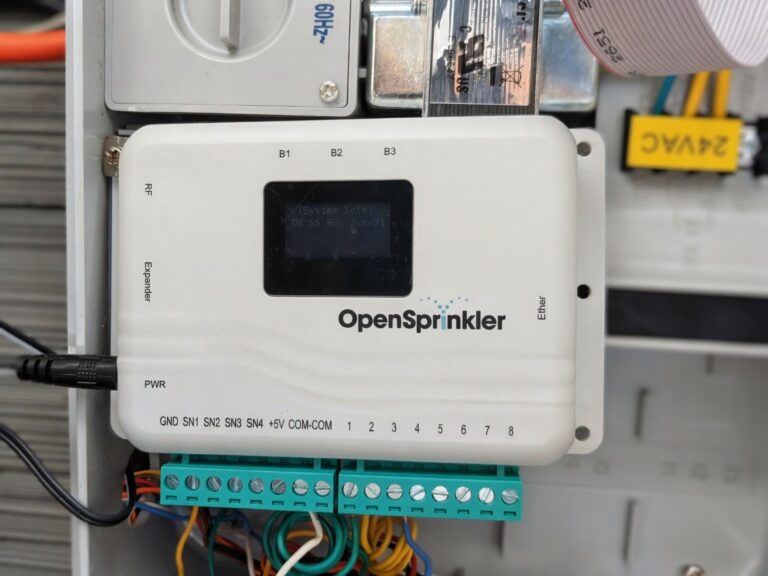
OpenSprinkler is an open-source irrigation controller that runs entirely on your local network. No cloud, no account, no subscription. It has a built-in web interface you can access from any browser on your WiFi, a full REST API, and a solid Home Assistant integration that communicates directly with the device; not through any third party.
It’s been around for years and has an active community behind it. And importantly, it’s a real finished product, not a Raspberry Pi project. It comes in a proper weatherproof enclosure ready to mount outside.
The Models
OpenSprinkler comes in three versions:
- 3.4 AC Power – Standard residential use. This is what you want. Includes the power adapter.
- 3.4 DC/USB – For solar or battery powered setups
- 3.3 Latch – For specialized latching solenoid valves (commercial/agricultural)
If you have a standard home irrigation system, you want the 3.4 AC.
What You’ll Need
Here’s my complete shopping list:
- OpenSprinkler 3.4 AC (~$169) – the controller and power adapter
- Weatherproof Outdoor Enclosure (~$35, optional) – I went with a new Orbit enclosure for a clean install. More on this below.
Total investment: roughly $200 for a fully local, Home Assistant-ready smart irrigation controller with no recurring costs.
Understanding Your Current Setup
Before you rip anything out, open up your existing controller and take photos of everything. Seriously — take more photos than you think you need.
Every residential irrigation system is wired the same basic way:
Zone wires – One wire per zone, each connected to a numbered terminal on the controller. These are what tell each valve when to open and close.
Common wire (COM) – A shared return wire that completes the circuit for all zones. Usually white, but not always. This connects to the COM terminal.
That’s really it. Identify your COM wire and your zone wires before you start, and the rest is straightforward. Sensors, rain sensors, and master valve wiring are all out of scope for this post, if you have those, check the OpenSprinkler documentation for how to handle them.
Why I Got a New Enclosure
Since I’d already ruled out the Hunter Hydrawise face replacement earlier in my research, I decided to go completely fresh with a new Orbit weatherproof enclosure. This gave me:
- A brand new clean setup
- A built-in GFCI outlet -> no extension cord needed
- A keyed lock
- The satisfaction of donating my old Hunter to someone who needs a solid dumb controller
If you do want the easiest possible upgrade path and local control isn’t a priority, the Hunter face swap is worth looking into. But for this build, starting fresh made the most sense.
The Wiring
This is the part that sounds scary but really isn’t. The OpenSprinkler uses a standard screw terminal block; loosen the screw, insert the wire, tighten it back down. Move one wire at a time from the old controller to the new one so you don’t lose track of anything.
Connect your COM wire to either of the two COM terminals (they’re identical), then connect each zone wire to the matching numbered terminal. Connect the 24VAC power adapter to the PWR terminals, plug it in, and you’re done with the physical install.
First Boot and WiFi Setup
When you power on OpenSprinkler for the first time it broadcasts its own WiFi hotspot; the network name starts with OS_ followed by a unique identifier for your device. Connect to it from your phone and it takes you directly to a configuration page to connect it to your home WiFi. It’s a really slick onboarding experience; no hunting for IP addresses or guessing at settings.
One thing to note during setup: OpenSprinkler has a default password which is part of the initial configuration flow. You’ll be prompted to change it, don’t skip this step. I don’t want to publish the default here since it’s publicly known, but it’s documented in the OpenSprinkler setup guide and the UI walks you right through it.
Once it joins your home network it gets a local IP address and you can access the full web interface from any device on your WiFi going forward. The web interface is clean and surprisingly capable; you can manage zones, set schedules, run manual tests, and monitor everything right from your browser with no app install needed.

PSA: Set a static IP reservation for OpenSprinkler in your router settings. That way if you unplug it for the winter and plug it back in months later, it comes back on the same IP every time.
Naming Your Zones
Before we get to the Home Assistant setup in the next post, take a few minutes to name your zones properly inside the OpenSprinkler web interface. Go to Edit Stations and give each zone a meaningful name like “Front Yard”, “Backyard”, “Side Yard”.
Why does this matter? Because when you connect OpenSprinkler to Home Assistant, it pulls these names in and uses them to generate entity IDs. Getting the names right now saves you from renaming everything later; trust me on this one. I also like to keep the naming convention consistent in Home Assistant so you can see in my image above, I used the prefix “os_” so things are a bit more organized in Home Assistant.
Final Thoughts
The swap took me about 30 minutes including taking photos of the old wiring. The hardest part was finding a small flathead screwdriver. The OpenSprinkler is a well-designed, solid piece of hardware and I’m genuinely impressed with how clean the install turned out.
What I gave up: a slick consumer app experience and a familiar dial interface.
What I gained: complete local control, no cloud dependency, no subscription, full Home Assistant integration, and the peace of mind that this system will keep working regardless of what any company decides to do with their servers.
For anyone already deep in the local Home Assistant rabbit hole, this is absolutely the right upgrade path.
Next up: Connecting OpenSprinkler to Home Assistant and building an irrigation dashboard that actually makes sense.